Projections
-
Go to
 [Menu] > [Configuration] > [Projections] (or [Selected entity ] > button
  [More] > button
  [Setup…] > field [Entity] > button
  > container
  [Projections]).
 -
Click the button
 [Add…] in tabular form.
 -
Fill in the required fields: “Projection name”, “Entity”, “Projection for transition”, “Edit mode”. Description of all fields in Projections.
-
Click the button
 [Create ] to add an entry or the button
  [Cancel] to exit the add mode without saving data.
Calculation fields are used to perform mathematical operations on the selected data. The age, time spent, and distance are calculated from the static fields. A view is created with the fields necessary for the calculation and a column with the result is added. The virtual field does not create a complete view, but only two columns: the primary key and the field with the result. Then the field is attached to the entity. An additional plus: painless removal and addition of columns. The view will have to be created again.
Pre-create an entity with a calculated value, the primary key of which will be> identical to the primary key of the entity for which theis virtual field> created.
-
Go to
[Menu] > [Configuration] > [Projection properties] (or [Selected entity] > button [More] > button [Setup…] > [Projection properties]. -
Click the button
[Add … ] in tabular form. -
Fill in the required fields: “Projection name”, “Column name”, “Is virtual” (in the value “true”), “Virtual property source”, “Original column name”. Description of all fields in Projection properties.
-
Click the button
[Create] to add an entry or the button [Cancel] to exit and from the add mode without saving data.
-
Go to
[Menu] > [Configuration] > [Projection properties] > [Selected entity] (or [Selected entity] > button [More] > button [Setup…] > container [Projection properties]). -
In the detailed form, click the button
 [Edit] to switch to edit mode.
 -
Change the field values: “Order”, “Projection name”, “Column name”, “Title”, “Type on display”, “Visibility”, “Read- only mode”, “Is nullable”, “Is foreign key”, “Reference projection”, “Reference key”, “Is virtual”, “Virtual property source”, “Original column name”, “Show in references”, “Concatenation”, “Default value”, “Hint”, “Pattern”, “Additional parameters”. Description of all fields in Projection properties.
-
Click the button
[Save] to save the changes or the button [Cancel] to exit edit mode without saving.
An option sets the information that is displayed in the drop-down list.
-
Go to one of the ways:
Method 1:
[Selected entity] > [Selected entry] > [Selected drop-down field] > button
> button [Setup…] > container [Projection properties] > [Selected field]).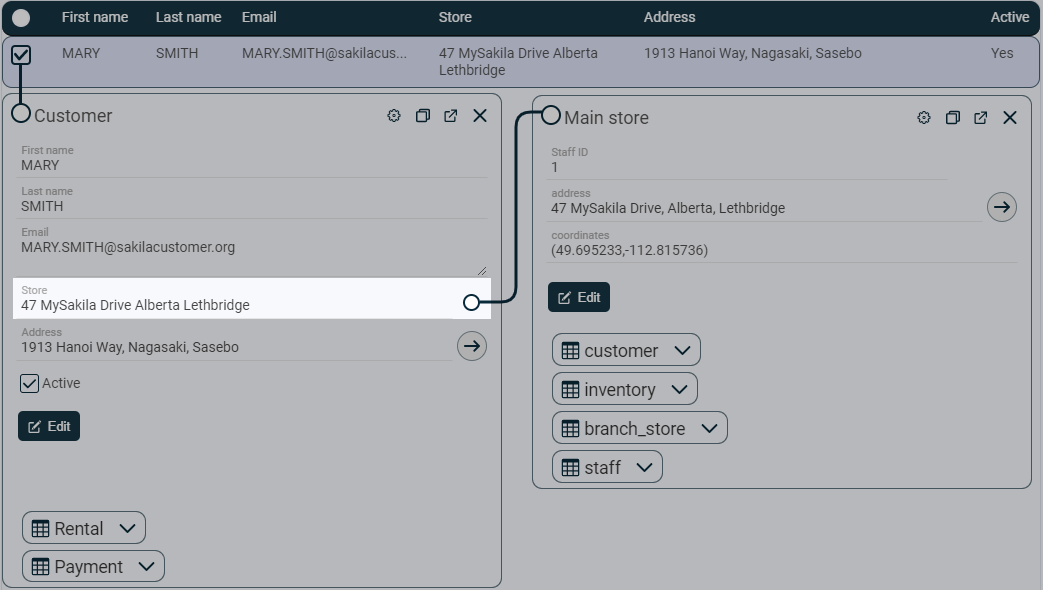
Method 2:
[Menu] > [Configuration] > [Projection properties] > [Selected field]). -
In the detailed form, click the button
[Edit] to switch to edit mode. -
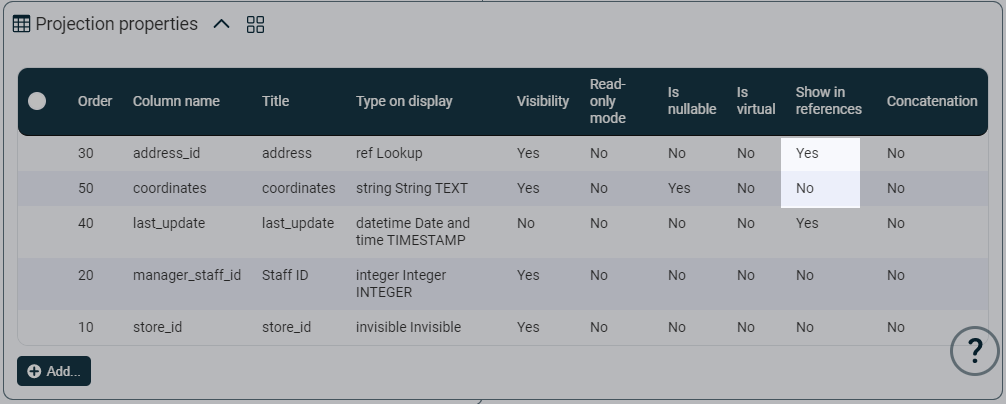
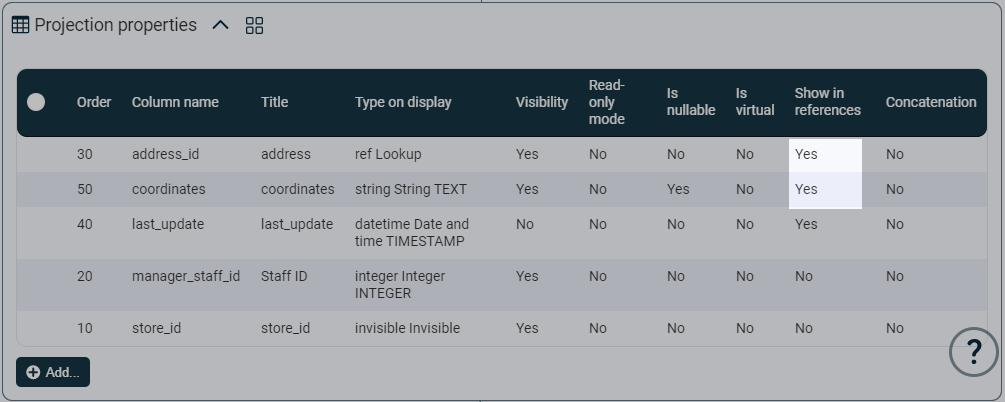
Change the value of the “Show in references” field. Description of the field in Projection properties.
-
Click the button
[Save ] to save changes or click [Cancel] to exit edit mode without saving.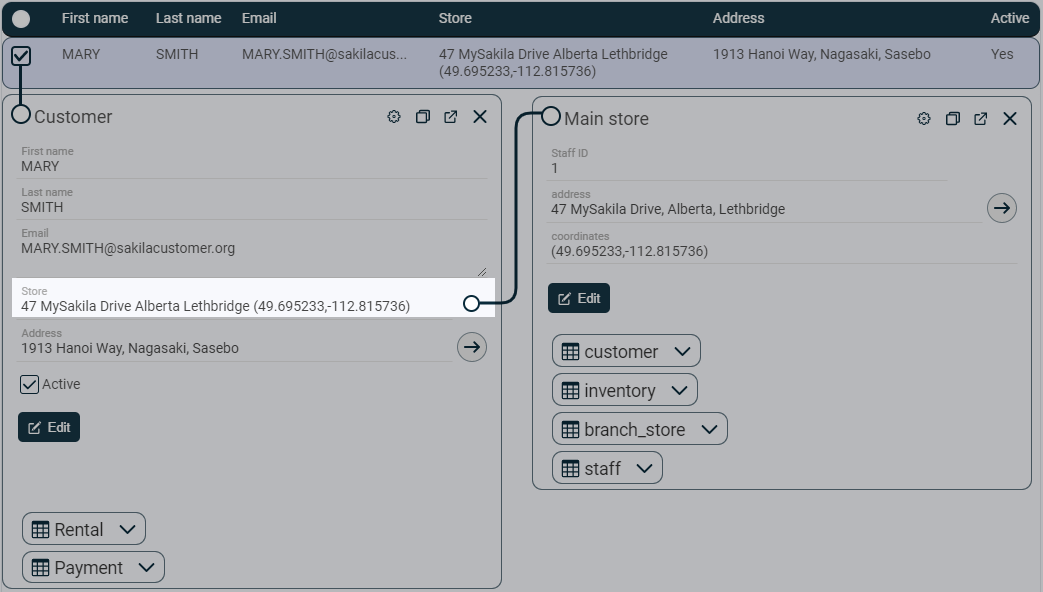
Fields with the “Show in references” flag set will be displayed in the drop-down field.
-
Go to
[Menu] > [Configuration] > [Projection properties] > [Selected entry] (or [Selected entity] > button [More] > button [Setup…] > container [Projection properties] > [Selected entry]). -
In the detailed form, click the button
[Edit] to switch to edit mode. -
Change the value of the “Type on display” field. Description of values in Field values “Type on display”.
-
Click the button
** [Save ] ** to save the changes or the button ** [Cancel ] ** to exit edit mode without saving.
Automatic display and hiding of fields by condition.
-
Go to [Selected entity] > button
[More] > button [Setup…]. -
In the detailed form, click the button
[Edit] to switch to edit mode. -
Enter in the field “Additional parameters”:
{
  "property_visible": {
    "a": {
      "field":"b",
      "op":"EQ",
      "value": "c"
    },
   ...
  }
}
Instead of a, b and c enter:
- instead of “a” - the name of the field (not the title), which should be displayed when the corresponding value appears in field “b”;
- instead of “b” - the name of the field, which will serve as an indicator for the field a;
- instead of “c” - the value, when it appears in the field “b”, the field “a” will be displayed.
-
For one field, you can set several conditions:
    {
      "property_visible": {
              "a": [{
              "field":"b1",
              "op":"EQ",
              "value":"c1"
              },
              {
              "field":"b2",
              "op":"EQ",
              "value":"c2"
              }
            ],
         ...
       }
    }
Conditions are combined with the “AND” operation.
If there are several fields that need to be hidden/displayed, then the lines are listed separated by commas inside the"property_visible" element.
-
Click the button
[Save] to save the changes or the button [Cancel] to exit edit mode without saving.
Blank fields are displayed only when editing.
-
Go to [Selected entity] > button
[More] > button [Setup…]. -
In the detailed form, click the button
[Edit] to switch to edit mode. -
Enter in the “Additional parameters” field:
{
    "hideEmptyFields":"a"
}
Instead of “a”, specify the value “true” or “false” to enable or disable the function, respectively.
By default, the function has the value “false”.
-
Click the button
[Save] to save the changes or the button [Cancel] to exit edit mode without saving.