First of all you need to create an environment for your information system. In any cases you need an Apache or Nginx web server and PostgreSQL database server.
The simplest way to get them on your own computer is using Docker. We recommend docker container with pre-installed Apache+PHP+PostgreSQL+Abris that we created specially for quick start. So open your command line prompt and enter:
docker pull abrissite/abris-free
docker run --name abris -it -p 80:80 -p 5432:5432 abrissite/abris-free
If you have your own installation of Apache2 and Postgres (see instructions how to install it on your system in a proper way) you need to download Abris Platform Demo zip-archive and unzip it in your web server directory:
wget https://abrisplatform.com/downloads/abris-free.zip
unzip abris-free.zip /var/www/html
Open your web browser and enter address (change “localhost” to proper value if address of your web server differs from default)
The installation form will be shown.
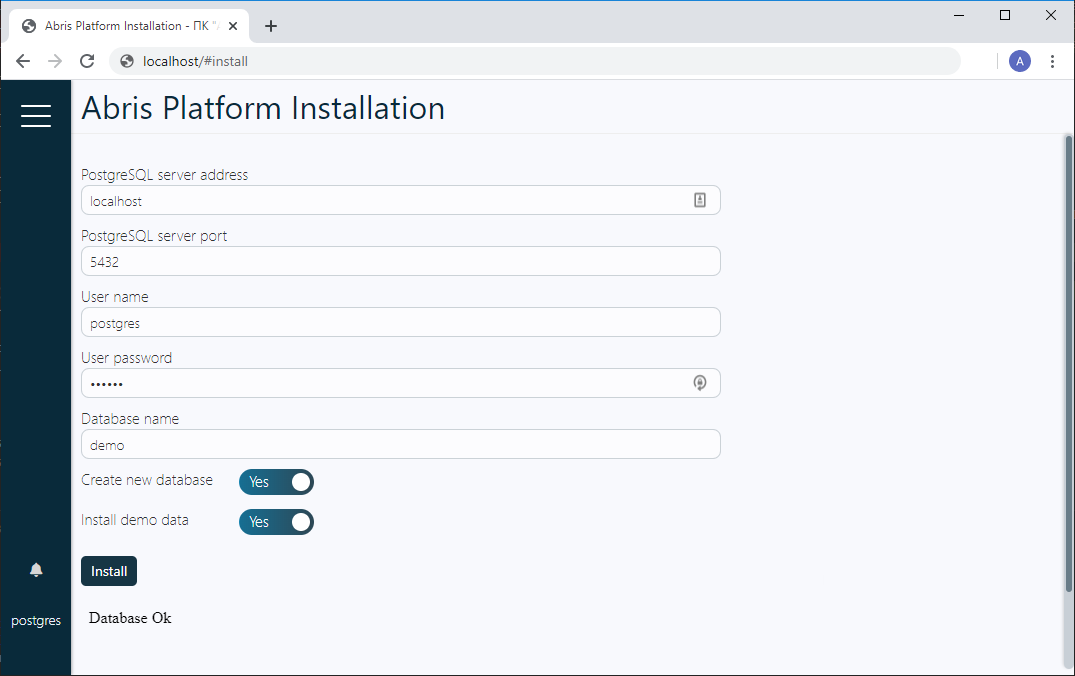
All parameters will be filled by default, you must change them only if you made some custom settings during Apache and PostgreSQL installation.
In this case you must set “Create new database” switch to “Yes” position. Also, if you are new to Abris Platform you should better to set “Install demo data” switch to “Yes” position. Abris Platform Installer will create demo database and it will be easier to learn its interface of database administrating. You can drop demo tables in any moment.
Enter your database name, username and password. Switch “Create new database” to “No”. In this case Abris Platform Installer will not create new database but connect to existing database using parameters you set. Please notice that Abris Platform need to store its own system data in database. For this purpose Abris Platform Installer creates new database schema “meta” with some tables, views, functions and triggers. This schema must stay in database all the time you use Abris Platform.
Click the “Install” button and see the installation progress in the bottom part of the Abris Platform Installer form.
To demonstrate the database creating we use a simplest database “Task Manager”.
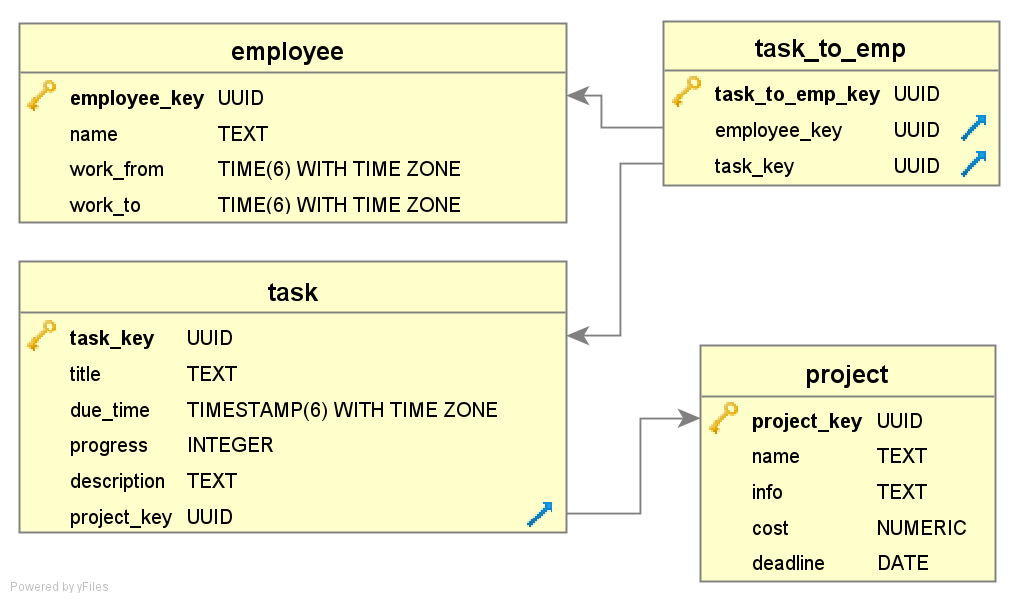
Tables task and project are “one-to-many” related with the regular foreign key constraint.
Employee and task are related as “many-to-many” implemented with the task_to_emp cross-table.
Open your site root address
Table “project”
See the Configuration menu and click Schemas items.
Here you can create more database schemas, but for the first simple database we will use the public schema. Click the table row and then activate Entities panel and click Add.
The entity form will be open. You must fill Table name field with “project” value (it will be the internal name of the table) and Title field with “Projects” (it will be the screen name of the table). Then click Save button.
When the entity is saved you can open Properties panel. One property is created automatically. It is the primary key field, it has an uuid type and name concatenated from table name and _key suffix.
Then click Add and fill the data for the first custom table column. Fill Column name with “name” value (it will be the internal name of the column) and Title field with “Name” (it will be the screen name of the field in tables and forms). Also set Data type in database selectbox to “text” and Display type selectbox to “caption”.
Then click Save button.
Add all the rest properties of the entity (columns of the table) the same way.
For property info set title “Information”, data type “text” and display type “plain”. This display type allows to edit field as multi-line text.
For property cost set title “Total cost”, data type “numeric” and display type “money”. This display type allows to view values as thousand-separated numbers.
For property deadline set title “Deadline”, data type “date” and display type “date”. This display type allows to edit field with the special date selector.
Now it is better to add a menu item for the table you created. Go to Configuration menu and click Menu item. Then click Add, set Entity to “project” and click Save.
Refresh browser window to reload database configuration and see that new menu item Projects. You can click it and fill some sample data to the table.
Go back to Configuration→Schemas menu and add entity with table name “employee” and title “Employees”.
Add property with column name “name” and title “Name”. Notice that you may to ignore fields Display type and Data type. In this case Abris Platform creates text column with string display type.
Add property “work_from” (“From”) and “work_to” (“To”) with data type “time with time zone” and display type “time”.
You can also add menu item for this table. Go to Configuration menu and click Menu item. Then click Add, set Entity to “employee” and click Save.
Add new entity with table name “task” and title “Tasks”.
Then add all entity properties.
|
Column name |
Display type |
Data type |
Title |
|
|
title |
caption |
text |
Title |
This property will be bold in table and form |
|
due_time |
datetime |
timestamp with time zone |
Due time |
This property will be edited in a form with date and time picker |
|
progress |
progress |
integer |
Progress |
This property will be shown as a progress bar in tables and integer editor in forms |
|
description |
text |
text |
Description |
This property will be shown as HTML tables and edited as a rich text in forms |
To create a reference between task and project you just need to add new property and select table project in Reference entity field.
This table implements “many-to-many” relationship and actually contains no own data, just foreign keys to related tables.
So, add entity task_to_emp and add two properties. For them you need to set only Reference entity field. Select “task” entity for the first property and “employee” for the second.
Refresh browser window and click Projects menu item. Click on table row. You can see not only project properties but the “Tasks” panel in the bottom of the form. It was created automatically when you add a property to table task related to table project. So now you can add tasks and they will be related to currently selected project.
If you add tasks to project and then click on any task you can see that addition panel Participants was added to the task form. So for any task you can add the participant that can be selected from the employee list. Remember that we just created table employee and now it is absolutely empty. Of course we can go to the Employees menu and add all the employees we need. But we can add employees in the participants form! Just click + button on the right of the Employee field, fill information about new employee and click Save button. Also there is → button that allows you to view information about referenced employee.
But what if we want to create a special relation panel for the form but have no corresponding table containing data we need with the foreign key? We can create a virtual relation using database views.
Go to Configuration→Schemas menu and add entity with table name “project_to_emp” and title “Project participants”, also fill the View definition field with the following query:
SELECT DISTINCT task_to_emp.task_to_emp_key as project_to_emp_key,
    task.project_key,
    task_to_emp.employee_key
   FROM (task_to_emp
     JOIN task USING (task_key));
This query joins task_to_emp and task tables and returns the recordset, containing project_key end employee_key. So this query can be used if we want to find all participants of the selected project.
Click Save button. Entity will be added and you can notice that it has type “View”.
After that you must edit properties. For property employee_key set Reference entity as “employee” and Reference entity key as “employee_key”. For property project_key set Reference entity as “project” and Reference entity key as “project_key”.
The last step is to create a virtual relation. “Virtual” because views can not have a foreign key constraint, but can be referenced just by data.
Go to Configuration→Schemas, find entity project and open its Relations panel. Then add relation with the following values:
© 2020 Research laboratory ABRIS Ltd